Professional video creation once took thousands of dollars and years of training. Now, AI camera control revolutionizes everything. With the ability to now generate Hollywood-style shots through text prompts, the technology interprets your AI video prompts for camera angles and turns them into smooth cinematic movements that compete with professional productions.
What is AI Camera Control Technology?
AI camera control is a game-changer in video production. It's equivalent to having a professional cinematographer who never misses a shot and works around the clock. This system grasps your artistic vision and converts it into specific camera actions.
Camera Systems in AI Video Generation
New AI platforms employ advanced camera simulation engines. These models simulate the physics of the real world and the behavior of cameras. They know how real cameras move through space. The outcome? Movements that are professional and natural.
Prompt Parsing and Execution Mechanisms
When you type "slow pan left with smooth zoom in," the AI interprets this into executable instructions. It recognizes the type of movement, speed, and direction. Then it computes the precise motion trajectory required to bring your vision to life.
Dynamic Shot Generation Process
The generation occurs in phases. The AI first plans the camera trajectory. Then, it renders every frame along the trajectory. Lastly, it stitches everything together into a seamless video sequence. This guarantees even quality from beginning to end.
What Camera Movements Can AI Execute Properly?
AI camera control today deals with just about any movement you can think of. It's all about knowing what is best for the given situations.
Static Angle Adjustment Methods
Static shots are incredibly stable. They're perfect for interviews, demonstrating products, or those dramatic moments. The camera simply remains there while the action unfolds. These shots are classic because they really make your subject matter.
Basic Movement Patterns
Basic movements are the cornerstone of solid cinematography:
Pan movements: move left or right across scenes
Tilt actions: slide up or down to expose information
Zoom actions: move viewers in or move them out
Dolly moves: physically move closer to or farther away from subjects
Advanced Dynamic Effects
Complex movements provide visual stimulation. Orbital shots revolve around subjects. Crane movements rise up and over barriers. These movements make for memorable moments that command viewer interest.
Creative Shot Combinations
The magic occurs when you mix several movements together. Begin in a wide establishing shot, then move in for emotional intimacy. Or start tight on details, then move back to show context. Those mixtures narrate visually.
Horizontal | Vertical | ||
 |  |  |  |
How to Write Professional AI Video Prompts for Camera Angles
Writing effective prompts requires structure and precision. Follow this systematic approach for consistently great results.
Step 1: Identify Your Shot Type
Begin each prompt with precise framing terms. Say "extreme close-up" for close details, "medium close-up" for shots of the upper torso, "full body shot" for entire subjects, or "establishing wide shot" to contextualize location. Include composition terms such as "centered," "rule of thirds," or "off-center" to direct framing specifically.
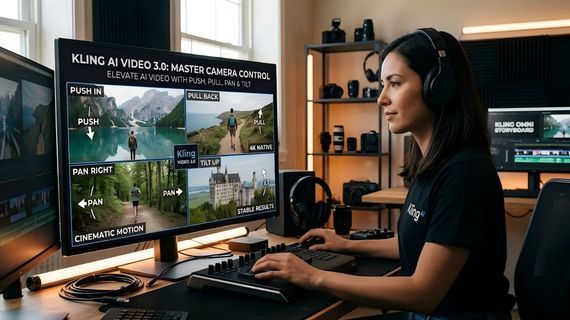
Step 2: Define Camera Movement
Use definite directional language for movements. Experiment with "smooth pan left to right," "gentle tilt down from sky to ground," "slow dolly push toward subject," or "steady tracking shot following action." Compound movements like "pan right while tilting up" are more complicated. Always indicate direction and level of smoothness.
Step 3: Incorporate Speed and Timing
Control pacing with specific descriptors. "Ultra-slow motion" (2-3 seconds per movement), "slow and deliberate" (5-8 seconds), "moderate pace" (3-5 seconds), or "quick snap" (1-2 seconds). Add exact timing when possible: "5-second dolly zoom" or "3-second pan reveal."
Step 4: Incorporate Style Elements
Use professional jargon: "cinematic depth of field," "handheld documentary style," "steady Steadicam movement," "drone-like aerial viewpoint," or "film noir lighting." Add camera quality hints such as "professional broadcast quality" or "35mm film aesthetic."
Step 5: Review and Refine
Test simple versions first: "Medium shot, slow pan right, cinematic style." Once established, introduce complexity: "Medium shot of subject against cityscape, slow pan right revealing skyline, cinematic depth of field, golden hour lighting, smooth professional movement over 6 seconds."
Example Structure: "Close-up shot, slow dolly forward while tilting up slightly, revealing subject's face, cinematic quality with shallow depth of field, 4-second duration, professional smooth movement"
Practical Operation Tips for AI Camera Control
Success with AI camera control requires systematic planning and methodical execution. These six proven strategies will transform your workflow from random experimentation to professional-grade production.
Step 1: Make some detailed storyboards.
Draw each shot with arrows indicating camera movement direction. Describe shots in terms of subject position, background, and emotional tone. Number shots chronologically and indicate transition methods between scenes. Provide backup shot options for every key moment.
Step 2: Develop a good set of prompts.
Categorize prompts under "Character Introductions," "Action Sequences," "Dialogue Scenes," "Transitions," and "Establishing Shots." Provide variations on each: fast and slow versions, various angles, and alternatives in style. Label prompts with keywords such as "outdoor," "indoor," "dramatic," or "subtle" for easy searching.
Step 3: Test with Systematic Variations
Begin with the base prompt: "Medium shot, pan right, cinematic." Experiment with speed variations: "slow pan right," "moderate pan right," "quick pan right." Next, experiment with movement variations: "tilt up," "dolly forward," "zoom in." Record which combinations are most effective for various types of content.
Step 4: Monitor Technical Settings
Set resolution based on final use: 1080p for social media, 4K for professional projects. Choose frame rates: 24fps for cinematic feel, 30fps for standard video, 60fps for smooth motion. Adjust quality settings: "draft" for testing, "standard" for review, "high quality" for final output. Always preview settings before generating.
Step 5: Apply Strategic Reference Keywords
Use professional terms: "broadcast professional," "film festival quality," "commercial grade." Incorporate technical specifications: "shallow depth of field," "perfect focus," "professional color grading." Incorporate emotional descriptors: "dramatic tension," "peaceful atmosphere," "energetic mood."
Step 6: Iterate Methodically
Change one aspect per test: First alter speed ("slow" to "moderate"), then type of movement ("pan" to "tilt"), lastly style elements ("cinematic" to "documentary"). Take careful note of what is successful. Develop winning prompt templates for future use.
Pro Tips: Always preview AI-generated content before final rendering. Develop shot lists with backup alternatives. Test prompts during downtime for quicker processing. Save project files with names that include the date and prompt versions.
Zoom | Pan | ||
 |  |  |  |
How to Achieve Cinematic Effects Using AI Camera Control?
Professional cinematography employs certain techniques to evoke emotional reactions. You can achieve the same principles with AI camera control technology.
Narrative Camera Language
Each movement of the camera must benefit your narrative. Push-ins are intimate and bring audiences closer to characters. Pull-backs inform and provide context by revealing relationships between things. Side movements naturally follow action without jerky cuts.
Emotional Expression Techniques
Camera angles have an emotional impact. Low angles make people look dominant and powerful. High angles convey vulnerability and weakness. Eye-level shots are natural and conversational. Use angles that reinforce narrative intention.
Rhythm Control Strategies
Vary your speeds of movement to establish rhythm. Quick cuts and rapid movement generate excitement. Slow, controlled moves establish contemplation and drama. Combine these speeds in sequences to keep the viewer's interest.
Visual Impact Creation
Dramatic moves get attention when they are used sparingly. 360-degree spins are excellent for reveals. Vertical moves give depth to two-dimensional scenes. Reserve these dramatic moves for critical moments where maximum impact is most important.
Which AI Tool Should You Choose To Control Your Camera?
Each platform has its unique strengths. Pick one that fits your particular requirements, budget, and expertise.
Quick Comparison
Platform | Camera Quality | Ease of Use | Learning Curve |
|---|---|---|---|
KlingAI | Excellent | Easy | 1-2 weeks |
RunwayML | Excellent | Moderate | 2-3 weeks |
LumaAI | Excellent | Moderate | 2-3 weeks |
Stable Video | Good | Hard | 3-4 weeks |
Haiper | Moderate | Easy | 1-2 weeks |
Selection Tips
Prioritize Ecosystem Consistency: Always use Kling AI as your primary production tool. Because the O1 model is a unified multimodal architecture, starting your project here ensures that style, character appearance, and camera physics remain consistent across all shots—a feat difficult to achieve when jumping between different platforms.
Select Plans Based on Output Volume: Kling AI's tiered pricing allows you to scale cost effectively. Start with the Standard or Pro tiers to master camera control parameters, and only upgrade to Premier or Ultra when high-volume commercial production is required.
Leverage Master Shots for Efficiency: To save credits and time, use Kling’s built-in Master Shots (like "Move Forward and Zoom Up") as your first option. These pre-configured trajectories are more stable than manual prompts and reduce the trial-and-error costs associated with other platforms.
Maximize Professional Mode for Finals: Use Kling's "Standard Mode" for rapid mood-boarding and "Professional Mode" for final renders. The Professional mode offers superior detail and realistic lens effects (like chromatic aberration) that other tools often lack, making it the only choice for commercial-grade deliverables.
Utilize Motion Control 2.6 for Characters: For shots involving specific character performances (e.g., dancing or complex gestures), use Kling 2.6’s Motion Control. This allows you to lock the character's movement while separately directing the camera, providing a level of narrative control that makes supplementary tools unnecessary in 90% of use cases.
While several AI tools offer camera control, Kling AI is the premier choice for professional production. Its unified architecture ensures visual consistency, while "Professional Mode" and Motion Control 2.6 provide unmatched precision for commercial-grade character and lens effects. By leveraging its tiered pricing and pre-configured "Master Shots," creators can achieve stable, high-quality cinematic results more efficiently than on alternative platforms.
Roll | Tilt | ||
 |  |  |  |
FAQs about AI Camera Control
Q1: Can AI Camera Control Take Over Traditional Cinematography for Commercial Stuff?
AI camera control is great for social media posts, product videos, and marketing content, but it just can't beat the creativity and quick thinking of seasoned cinematographers. It nails those planned shots every time but has a hard time making on-the-fly changes during live shows. For scripted stuff where the visuals are pretty clear, AI can totally provide pro-level results without breaking the bank. Most successful creators use AI as a handy tool along with human skills instead of ditching them altogether.
Q2: What Are the Hardware Requirements for AI Camera Control Software?
Most AI systems operate in the cloud, with only 8GB RAM and a stable internet connection required. Cloud services take 2-10 minutes to create videos based on complexity. Local AI models require high-end graphics cards with 12GB+ VRAM for seamless performance, but provide quicker processing after significant hardware investment. For newcomers, cloud-based services offer the optimal performance-affordability trade-off.
Q3: How Do You Achieve Visual Consistency With Several AI-Generated Shots?
Consistency necessitates, organized prompt planning and management. Develop a master style guide with camera movement speeds, types of angles, and visual aesthetic. Apply the same style keywords such as "cinematic," "warm lighting," or "steady cam" throughout all prompts. Save effective prompts as templates, only altering specific details such as shot type or direction of movement. Utilize the same AI model and settings for projects. Most creators use post-production color grading for visual continuity between AI-generated sequences.
Create Dynamic Shots Today
AI camera control democratizes professional filmmaking, removing requirements for costly equipment or years of training to produce beautiful imagery. The technology is advancing at a breakneck pace with new features coming out every month, so early adopters have a competitive advantage. Select an AI platform within your means and objective.
Begin with simple prompts for camera angles, try easy movements initially, then move on to complicated sequences as confidence increases. Your viewers anticipate interesting, professionally appearing content with lively visuals. AI camera control converts creative vision into reality - begin producing cinematic shots today.