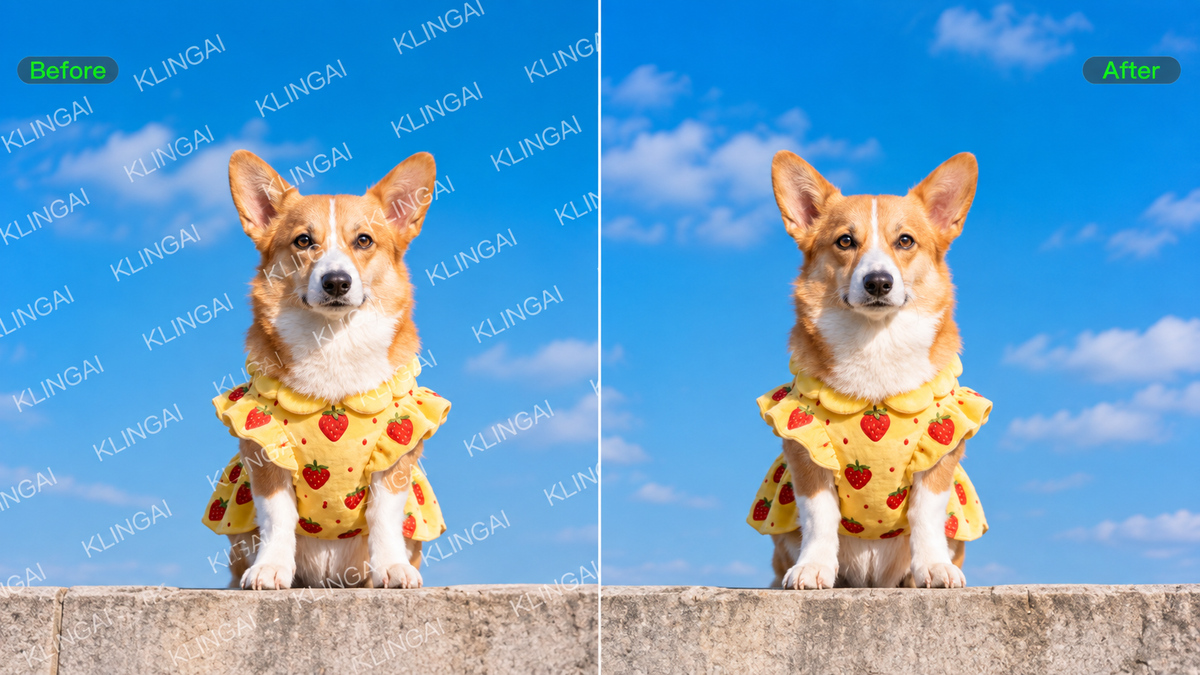
Choosing the best watermark remover depends on what the mark covers and how much control you need over the edit. A small logo on a plain corner calls for a different approach than text running across hair, fabric, or a detailed subject. This guide compares six practical options, explains what can affect cleanup quality, and shows how you can get more precise results with Kling AI when the image needs closer attention.
What Makes a Good AI Watermark Remover?
The tool type only tells part of the story. To see how well an AI watermark remover actually performs, compare the 6 points below:
- Clean Removal: The watermark should disappear without visible traces or leftover shadows.
- Background Match: The repaired area should blend naturally with the surrounding image.
- Detail Preservation: Hair, fabric, foliage, patterns, and sharp edges should remain convincing.
- Removal Method: The tool should offer a removal method that fits your workflow, whether automatic, manual, or prompt-based.
- Image Resolution: The final image should retain enough resolution for its intended use.
- Ease of Use: The process should be simple enough to complete without unnecessary extra editing.
6 Best Watermark Remover Tools
The best watermark remover for you usually depends on where the mark sits, what it covers, and how much control you want over the edit. Some tools keep the process quick with a brush or selection, and others give you prompts, generative editing, or a full set of retouching controls. Here is a quick look at where each option fits.
Tool | Best For | Removal Approach | Editing Scope |
Kling AI | Detailed or difficult watermark removal that needs contextual reconstruction and follow-up refinement | Natural-language prompts, arrow/selection/doodle editing, and Eraser Pen | Watermark removal, contextual reconstruction, targeted refinement, broader image editing, and native 2K/4K output with IMAGE 3.0 Omni |
HitPaw Watermark Remover | Dedicated watermark removal for different mark types | Area selection with multiple removal modes | Focused image and video removal |
Picsart | Everyday watermark and object cleanup within a photo editor | Object Remover with targeted selection and AI-generated fill | Watermarks, text, logos, objects, and general photo editing |
Adobe Photoshop | Precise edits that may need further refinement | Remove, selection, fill, and retouching tools | Full professional photo editing |
Fotor | Online cleanup and batch image editing | Automatic detection and manual brushing | Browser-based photo editing |
Cleanup.pictures | Small localized marks and unwanted objects | Brush-based AI inpainting | Focused browser cleanup |
1. Kling AI
With Kling IMAGE 3.0, you can describe the watermark, logo, text, or other unwanted element you want to remove in natural language. IMAGE 3.0 also supports text to image creation and broader image editing, so you can work with prompts across different visual tasks. When placement matters, you can first mark the target area with arrows, circles, or other visual annotations using another editing tool, then upload the annotated image to Kling IMAGE 3.0 to guide the edit.
IMAGE 3.0 can rebuild that region in context and follow the surrounding lighting, texture, and visual style. This gives you both semantic and spatial control when a watermark overlaps fabric, part of a subject, or another visually detailed area.
Reference Image | Output |
.png?x-oss-process=image/resize,w_1872) | .png?x-oss-process=image/resize,w_1872) |
For more demanding edits, Kling IMAGE 3.0 Omni extends this workflow with more targeted image-to-image refinement and native 2K/4K output. After the main watermark cleanup, you can continue refining a small area that still looks soft, patterned, or slightly inconsistent, while keeping the rest of the image unchanged. This is especially useful when a watermark crosses product details, fabric texture, hair, or other visually sensitive areas where a cleaner final result matters.
2. HitPaw Watermark Remover
HitPaw gives you several ways to handle a watermark after you mark the target area. You can use a marquee, polygonal lasso, or brush, then choose from options such as AI Mode, Texture Repair, Edge Filling, and Smooth Filling for images. You can preview the result before export, giving you a chance to check the repaired area before saving the image.
3. Picsart
Picsart includes watermark removal within its broader photo editing toolkit. With the Object Remover, you can brush over unwanted watermarks, text, logos, or other objects, and AI-generated content fills the cleared area. It works well for users who want watermark cleanup alongside other everyday photo editing tools in the same workflow.
4. Adobe Photoshop
Photoshop gives you several ways to remove unwanted content inside a full photo editor. You can brush over a mark with the Remove tool, define a selection for Content-Aware Fill, or use Generative Fill when you want Photoshop to create new content in the selected area. You can then continue refining edges, layers, or other parts of the image in the same document.
5. Fotor
Fotor gives you both automatic and manual options in the browser. Smart Detection can locate common watermarks, text overlays, date stamps, and repeating patterns, and you can use the brush when you want to adjust the target area yourself. Fotor also offers batch watermark removal, which can save you time when several photos need similar cleanup.
6. Cleanup.pictures
Cleanup.pictures keeps the interaction focused on the area you want to remove. You brush over a watermark, text, logo, or unwanted object, and the tool uses inpainting to fill the marked space. The simple browser setup works well when you already know exactly which small part of the image you want to clean up.
How to Remove a Watermark From a Photo With Kling AI
Removing a watermark with Kling AI only takes a few steps. Start with an image you own or have permission to edit, then use IMAGE 3.0 to describe the unwanted mark and guide the edit. If the cleaned area still needs additional detail work, you can continue refining the result with IMAGE 3.0 Omni.
Step 1: Upload the Image You Want to Edit
Upload the clearest version of the photo available. A higher-quality source gives Kling AI more visible information around the watermark, which is especially helpful when the mark overlaps hair, fabric, product details, or textured backgrounds.
Step 2: Describe What You Want to Remove
Tell Kling IMAGE 3.0 exactly what should be removed, such as a watermark, logo, text overlay, label, or stamp. Keep the instruction focused and mention important details that should remain unchanged. If the target area is difficult to describe with text alone, you can first mark it with arrows, circles, or other visual annotations using another editing tool, then upload the marked image to Kling IMAGE 3.0 together with your prompt. Kling AI’s separate Eraser Pen workflow lets you manually mark the area you want to remove.
Step 3: Generate, Review, and Refine
Generate the edited image and check how naturally the repaired area blends with the surrounding lighting, texture, and composition. If an edge, pattern, or other small detail still needs attention, continue with a targeted edit rather than changing the whole image. For projects that need further refinement or a higher-resolution final result, Kling IMAGE 3.0 Omni supports continued image editing with native 2K/4K output.
.webp?x-oss-process=image/resize,w_1872)
How AI Watermark Removal Works on Different Backgrounds
When you remove a watermark from a photo, what sits underneath the mark can make a noticeable difference to the result. An AI watermark remover will usually have less to reconstruct on a plain wall, open sky, or smooth gradient. Hair, text, patterned fabric, and other detailed areas give the model more visual information to interpret and rebuild.
Background | Expected Difficulty |
Plain Sky or Wall | Lower |
Soft Gradient | Lower to moderate |
Clothing or Textured Surface | Moderate |
Hair or Detailed Objects | Higher |
Repeated Patterns | Higher |
Mark Covering Key Subject Details | Higher |
When an AI tool reconstructs an area covered by a watermark, it cannot reveal the original pixels hidden underneath. It generates new content that fits the visible context around the edited area. You will usually get more consistent results when the surrounding colors and textures are simple, while faces, fine text, hair, and intricate patterns leave more details for the model to recreate.
How to Get Better Watermark Removal Results
Even with a capable editing tool, the way you prepare and guide the edit can affect the final result. When you remove a watermark from a photo, start with the cleanest source you have and keep the target or instruction as focused as possible. A few small adjustments can help you avoid blur, repeated textures, and unnecessary changes around the mark.
- Use the Best Source Available: Start with the highest-quality version of the image you have. More visible detail gives the model or editing tool more context to work with.
- Keep the Target Area Tight: If you are using a brush or selection tool, cover only the unwanted mark and avoid nearby edges, textures, or subject details.
- Be Clear About What Should Stay: For prompt-based editing, describe what you want removed and mention any nearby details you want to preserve.
- Check at Full Size: Review the finished image at full resolution so you can catch soft edges, repeated patterns, texture mismatches, or other visible artifacts. If a small detail still needs attention, an AI photo editor can help you make a focused follow-up adjustment before export.
- Refine One Thing at a Time: If the first result looks off, adjust either the selected area or the instruction before you try again. This makes it easier to see which change improves the edit.
- Use Targeted Editing Controls: An AI image generator with local editing options can help when a mark sits close to details you want to keep intact.
AI Watermark Remover vs Traditional Editing
Each removal method gives you a different kind of control over the final image. An AI watermark remover can rebuild covered content for you. Manual tools let you define the target area more precisely. The right method depends on where the mark sits, how much detail it covers, and how much of the original composition you want to keep.
Method | Best For | How You Control the Edit |
Dedicated AI Remover | Quick, focused watermark cleanup | Identify or select the unwanted mark |
Brush or Eraser Tools | Small, clearly defined marks | Paint directly over the target |
Clone and Healing Tools | Precise retouching on smaller areas | Sample and repair nearby pixels manually |
Generative Image Editing | Marks crossing detailed visual content | Guide the change with prompts or visual references |
Cropping | Edge marks that do not affect the main subject | Reframe the image |
Cropping can work well when the watermark sits near an edge and the new framing still looks balanced. If the mark covers an important part of the image, generative editing gives you more room to rebuild missing visual detail.
If you already know exactly which area you want to clear, Kling AI’s Eraser Pen gives you direct brush control. You can mark the unwanted region yourself, which makes it a practical option for small, localized cleanup with clear boundaries.
When Should You Not Remove a Watermark?
Before you remove a watermark, check whether you own the image or have permission to edit it. A watermark may also identify the creator or rights holder, so the decision can involve more than the appearance of the image. Use these common situations as a quick rights check before you start.
Check Carefully Before Removing | You Have Clearer Permission When |
You do not own the image and have no permission to edit it. | You created the image and added the watermark yourself. |
The license or usage rights are unclear. | The license clearly allows you to modify the image. |
The watermark identifies a photographer, studio, creator, or rights holder. | The rights holder has explicitly authorized the edit. |
A licensed, unwatermarked version is available for your intended use. | A client who owns or controls the relevant rights has asked you to make the change. |
A watermark may include copyright management information that identifies the creator or rights holder. Removing that information can raise legal issues in some situations, so check the license and your rights before you make the edit. Rules can also vary by country and by the terms attached to the image.
The End
Choosing the best watermark remover depends on the mark, the background, and the level of control you need. Simple areas may only need a quick cleanup, but detailed textures often call for more careful reconstruction and review. For those more demanding edits, Kling AI gives you more room to guide the final result.
FAQs
Can I Remove a Watermark Without Cropping the Image?
Yes. If cropping would cut into your subject or change the composition too much, AI editing can rebuild the area covered by the watermark. This can work well when you want to keep the original framing and limit the change to the affected part of the image.
How Do I Remove a Watermark From a Photo?
Start with an image you have the right to edit, then upload it to your chosen removal tool. You can describe the watermark or mark the affected area, depending on the editor you use. After the edit, check the image at full size for soft edges, repeated textures, or details that no longer match the surrounding area.
Can AI Completely Remove a Watermark?
AI can remove many visible watermarks, but the final result depends on what the mark covers. Plain skies, walls, and simple textures usually give the model more straightforward visual context. Hair, faces, patterned fabric, fine text, and sharp edges require more reconstruction, so you may need to review or refine those areas after the first edit.
How Can You Preserve Image Quality After Removing a Watermark?
Start with a clear source image and keep the edit focused on the area you want to change. With Kling IMAGE 3.0, you can guide the model with text instructions and visual references so the repaired area follows the surrounding lighting, texture, and style. Check the final image at full size and refine any edges or patterns that still look inconsistent.
Is It Legal to Remove a Watermark?
That depends on who owns the image, what permission you have, and what the license allows. If you created the image or the rights holder has authorized the change, the situation is clearer. If ownership or usage rights remain uncertain, check the license before you edit or remove attribution information.