Imagine directing a digital actor who obeys your every command. Well, you are just a Kling AI away! You provide the puppet and the strings; Kling AI performs the show.
A New Era of Digital Puppetry
Generative video is often like a slot machine. You type a prompt, pull the lever, and hope for a jackpot. Sometimes the result looks great; other times, people merge into walls. We understand that creators like you need consistency more than ever before; you have craved a way to direct the action precisely.
Kling VIDEO 2.6 answers that call with a sophisticated Motion Control system that changes how we generate content. The concept is simple but powerful. You take a static image of a character. Then, you take a video of a movement. The AI fuses them. Your character performs the movement from the video, functioning exactly like digital puppetry.
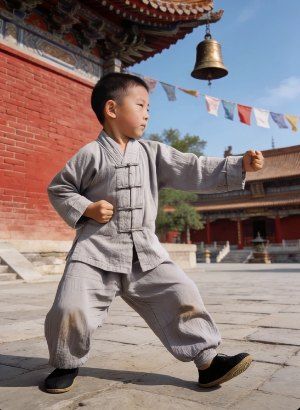
Kling VIDEO 2.6 Motion Control is a quite a step forward. Early AI models struggled with complex physics. Arms would disappear during a fast dance. Legs would float. The new 2.6 update fixes those physics issues. It captures high-difficulty moves like martial arts kicks, intricate dance routines, and sports actions with startling clarity. It understands that a human body has weight and momentum.
What Sets the Kling VIDEO 2.6 Motion Control Apart?
The motion control has a lot to offer, which is defining and shaping the times.
- Full-body movement sync: Synchronizes full-body movements with facial expressions, lip syncing, and background actions to ensure seamless motion in the video.
- Complex motion performance: Supports complex movements like dance, physical techniques, and martial arts, offering detailed motion rendering.
- Hand movement detail: Captures hand movements, poses, and gestures in great detail for enhanced realism and accuracy.
- 30s motion time limit: Allows users to input 3 to 30 seconds of motion video, generating a complete action sequence within the frame.
- Frame-by-frame instructions: Users can input motion actions along with text descriptions to create and control animations more effectively.
| Motion Reference | Image Reference | Output |
|---|---|---|
 | 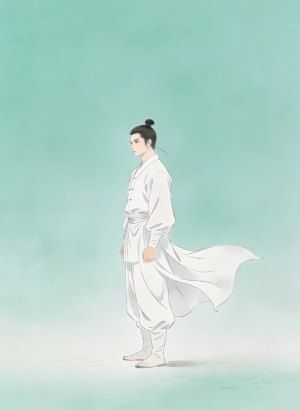 | 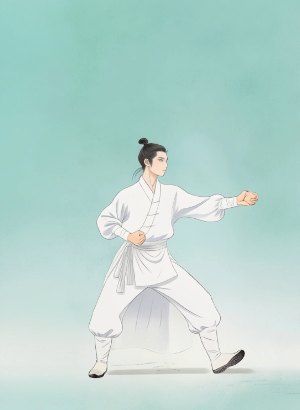 |
How the Kling VIDEO 2.6 Motion Control Works
To use the tool effectively, you must understand that it relies on three distinct inputs.
- Input A: The Motion Reference (The Video). The video drives the action. It provides the skeleton, the timing, and the physics.
- Input B: The Character Reference (The Image). The image provides the skin. It defines who is performing the action.
- Input C: The Text Prompt (The Context). The prompt defines the atmosphere. Since the video handles the action and the image handles the character, the text focuses on lighting, background, and style. You use text to tell the AI if the scene happens at night or during a sunny day.
How to Use Kling VIDEO 2.6 Motion Control
Creating your first Motion Control video is a breeze.
Step 1: Upload Your Motion Reference
Navigate to the Motion Control tab on the web or app interface. Upload a video containing the action you want to mimic. You can use a file from your computer or choose a pre-made clip from the Motion Library. The library is a great place to start if you lack your own footage.
Tip: Use a video with a clear subject. If the reference video is messy or has low contrast, the AI will struggle to see the limbs.
Step 2: Upload Your Character Image
Next, upload the static image of your character.
Crucial Rule: Match the proportions. If your video shows a full-body shot of a dancer, your image must also be a full-body shot. If you upload a close-up photo of a face and try to apply a dancing video to it, the system will fail or produce a nightmare. The "full-body/half-body" composition in the image must align with the "full-body/half-body" composition in the video.
Step 3: Select Your Orientation Mode
That is the most important setting in the entire interface. You have two choices, and they drastically change the output.
Option A: Character Orientation Matches Video
By default, the video will be generated using the "Character Orientation Matches Video" setting. This means the character's movements, expressions, camera movements, and orientation will align with the motion reference. Additional details can be adjusted via prompts.
Option B: Character Orientation Matches Image
When selecting "Character Orientation Matches Image" to match the character's orientation to the image reference, the character’s movements and expressions will follow the motion reference, and the orientation will match the character’s pose in the reference image. Camera movements and other aspects can be customized through prompts.
Step 4: Craft the Prompt
Enter your text prompt. Remember, you do not need to describe the action ("A man walking") because the video already tells the AI to make the man walk. Instead, describe the scene. "A cinematic shot, neon lighting, cyberpunk city, 4K resolution, volumetric fog." Use the prompt to fine-tune scene details.
Step 5: Hit “Generate”
Hit the button and wait. The AI will analyze the skeleton in your video, map it to your image, and render the frames.
How to Achieve the Best Results
To help you get the most out of this powerful tool, here are some key tips to ensure your animations are smooth, realistic, and perfectly in sync.
- Align the character’s proportions in the image reference with those in the motion reference video. For instance, avoid using a full-body video reference with a half-body image to ensure consistency. Keep the character’s body and head visible to enhance accuracy in the results.
- Choose a motion reference that demonstrates a broad range of movements, with moderate speed and minimal displacement. Steer clear of overly complex or fast actions, as these may not translate well into the animation.
- Make sure there’s ample space for the character to move freely in the image reference. This helps prevent parts of the character’s body from being cropped during motion transfer.
- Avoid using motion references with cuts or camera movements. These interruptions can confuse the system, so steady and smooth movements will give you the best outcome.
- Ensure the character’s body and head remain unobstructed in the image reference. Any hidden parts may interfere with the motion transfer, so make sure everything is clearly visible.
- Use only a single character in the motion reference. When multiple characters are involved, the system will focus on the one occupying the most space in the frame, so using a single character ensures clear motion control.
- Keep the image size and resolution within the recommended limits: the short edge should be at least 300px, and the long edge must not exceed 65536px. Additionally, ensure your motion reference video lasts between 3 and 30 seconds for optimal results.
- Match the character’s orientation carefully to the image. Movements and expressions should follow the reference motion, while the character’s pose aligns with the reference image’s orientation.
- Upload clear, real human actions to ensure the motion is faithfully replicated. Though stylized humanoid or animal figures can be recognized, human-like movements are typically more accurate.
- Control the background by customizing it through prompts, if necessary. However, keep the background stable during the motion reference to avoid disrupting the flow of the animation.
- Limit the duration and complexity of the motion reference. Ideally, it should last between 3 and 30 seconds. Complex or fast-paced motions might result in a shorter output than expected, so adjust the complexity and speed to avoid excessive credits usage.
| Motion Reference | Image Reference | Output |
|---|---|---|
 |  |  |
Creative Applications
What can you actually do with the tool? The possibilities are vast.
Social Media Content
You can film yourself doing a trending dance in your living room. Then, upload a photo of a cool 3D avatar or a painted character. Suddenly, the avatar is doing the dance. You become the puppeteer for infinite characters.
Professional Animation
Animators can use it for "rotoscoping." Instead of drawing every frame of a character walking, they film a reference video and let the AI apply the motion to their character design. It saves weeks of work.
Marketing and Ads
A brand can take a single photo of its mascot. Using different motion reference videos, they can make that mascot wave, run, jump, or point to a product. They do not need to build a complex 3D rig. A single 2D image becomes a living asset.
Virtual Acting
Since the tool supports lip sync and expressions, you can deliver a monologue to your webcam, and have a historical figure or a fantasy creature deliver that same speech with your exact emotional inflection.
Why "Native Audio" Matters
In the past, you generated a silent video. Then you went to a sound library, found a generic sound effect, and tried to paste it on top. It never looked quite right.
Kling VIDEO 2.6 generates the audio simultaneously with the video. It understands the "semantics of sounds and dynamic visuals." If the character taps their foot, the model generates a tap sound at that exact moment. If they speak, the lip movements align with the generated voice.
The synchronization creates an immersive experience. The pacing of the speech, the ambient background noise, and the visual actions are "tightly coordinated." It eliminates the disjointed feeling of separate visuals and sounds.
Summary
Kling VIDEO 2.6 Motion Control is a breakthrough in generative video. It allows us to drive character actions using reference videos, featuring precise hand movements, lip sync, and complex choreography. The system uses two orientation modes: "Matches Video" for physical accuracy and "Matches Image" for camera control. With native audio synchronization and the ability to generate 30-second clips, it transforms static images into dynamic, professional-grade video assets.
FAQs
Q1: What’s the difference between motion transfer and text-to-video motion prompts?
Motion transfer uses a real motion source (a reference performance) as the movement blueprint, so you’re not “describing motion,” you’re importing it. Your text prompt should mainly guide scene, lighting, style, and atmosphere, while the reference video handles timing, gestures, and pacing.
Q2: What makes a “good” reference motion clip for stable results?
The best driving clips have clear full-body visibility, clean separation from the background, and readable limb motion (no heavy occlusion). If the motion is hard to interpret, the model will “guess,” and that’s where distortion and jitter usually start.
Q3: How do I write prompts that improve realism without breaking the motion?
Think of the prompt as production direction, not choreography. Describe where the subject is, what the camera/lighting mood feels like, and the visual style (cinematic, studio, neon street, etc.). Over-directing movement in text can fight the reference motion and reduce coherence.
Q4: Why do identity or body proportions “drift” during motion transfer, and how can I reduce it?
Drift often comes from mismatched viewpoints, missing body parts in the source image, or motion that demands details the image doesn’t contain (hands, fingers, feet). Use a character image with visible limbs, avoid extreme occlusion, and keep pose + framing reasonably compatible with the driving clip so the system doesn’t need to hallucinate anatomy.